
My favorite cookie recipe: Mrs Fields Krispies
May 10, 2013
I have a confession to make: cookies are not my favorite thing. For the most part, I could take them or leave them. If I'm going to have something sweet, I would much rather have some amazing ice cream or a moist cupcake or some of my favorite candies. There's something about the often dry, overly-sweet, 'blah' texture of a cookie that just doesn't do it for me. That is, except for these gems which I discovered in a Mrs. Fields recipe book circa 1994.
Krispies are the perfect marriage of sweet and salty, crunchy but chewy. I know most people are very particular about their cookies - nuts, no nuts, milk chocolate, dark chocolate - so I'm sure these aren't for everyone. But for me, these are the cat's pajamas, the cream of the crop and the cookie I would request if it was the last one I ever got to eat.
Hope you enjoy them as much as I do!
Mrs. Fields Krispies
2 cups all-purpose flour (I use German 405)
1/4 tsp salt
1/2 tsp baking soda
1/2 cup dark brown sugar, packed
1/2 cup white sugar
3/4 cup salted butter, softened (I use 3/4 of a standard European butter and add a pinch of salt)
1 large egg
2 tsp pure vanilla extract (no substitutions)
1 cup Rice Krispies cereal
1-1/2 cups (8oz/227g) crispy rice chocolate bar, coarsely chopped (see below for my recommendation when you can't get your hands on a Nestlé Crunch bar)
Preheat oven to 300°F/150°C. In a medium bowl, combine flour, salt and soda. Mix well with a wire whisk and set aside. In a large bowl, blend sugars with an electric mixer at medium speed. Add butter and mix to form a grainy paste. Scrape down sides of bowl, then add egg and vanilla. Beat at medium speed until light and fluffy. Add flour mixture, Rice Krispies and chocolate chunks, blend at low speed until just combined (do not overmix). Drop by rounded tablespoons onto ungreased cookie sheets, two inches/ centimeters apart. Bake for 22-24 minutes. Immediately transfer cookies with a spatula to a cool, flat surface.
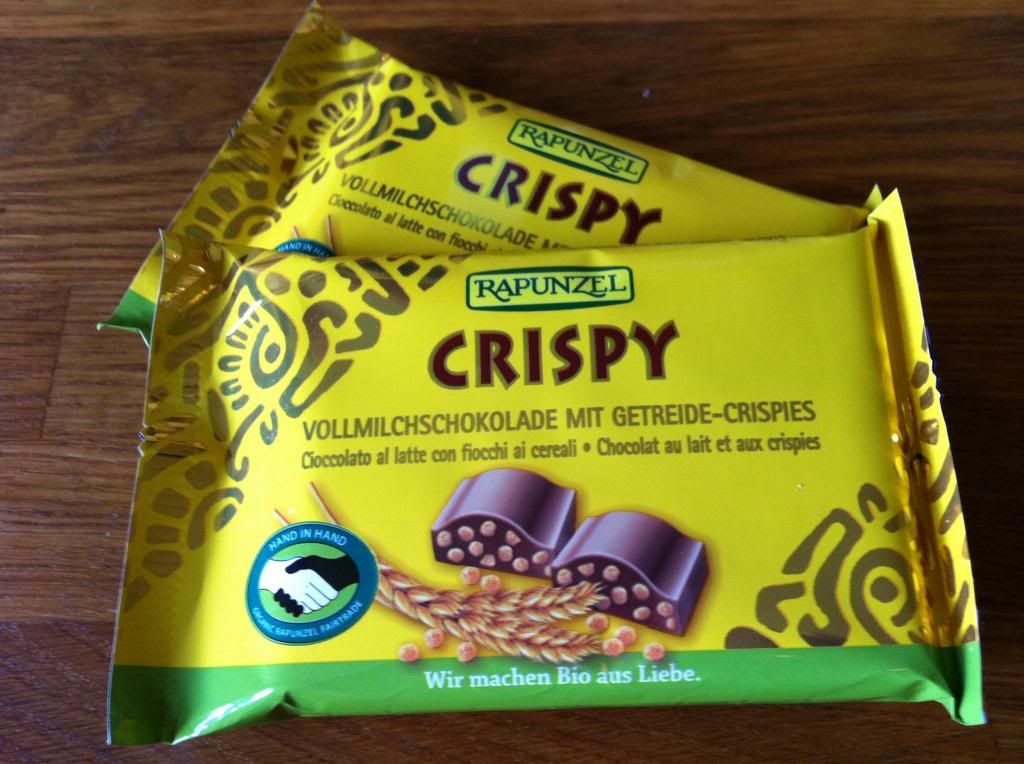
Here in Europe, Nestlé Crunch bars are nearly impossible to come by and every rice-related chocolate bar in Europe seems to favor the puffed variety, rather than the good crunch of crisped rice. This is well and good for snacking, but puffed rice just makes these cookies fall flat. I was at a loss until I found these babies: Rapunzel's Crispy chocolate bars, which I buy at Alnatura. If you happen to find another great substitution for this chocolate, I would love to hear about it.
And also, these cookies are best enjoyed thoroughly cooled for that perfect crunch!
May 07, 2013
One of my favorite things about living here is how we can have no big plans in the coming week, only to find our weekend filled with the abundant festivals and celebrations so common this time of year. After our errands on Saturday, we headed to the Mainzer Weinetage just about the same time the rain clouds cleared and the sun came out. As much as I love our fests in Wiesbaden, there is just something so fantastic about the stretch of riverside on which Mainz holds its festivals.
I also love that Mainz is such a different crowd. Sure, there are some older, more posh wine connoisseurs, I'm sure, but the younger, more laid-back vibe is a nice change. The wineries were being very generous with their pours and there were some hipper, downright enjoyable music performers, most notably this great little instrumental quartet whose music transported you to Midnight in Paris. Of course, there were also the ubiquitous groups of bachelor and bachelorette parties, which in Germany mean coordinated dressing up, embarrassment of the bride/groom and selling of some kind of food or trinkets to the crowd. These kinds of fests make me a little sad about all we will be leaving behind when we move, but I know Berlin holds so many new and different things, we won't be disappointed.
While Saturday was a bit of a last minute outing, Sunday's event was something we had been looking forward to since we had received an invitation to the celebration: our favorite maker of Sekt, Schloss Wachenheim, was having a party for its 125th anniversary. Even though they have been sold out of our very favorite Sekt - Muskateller Pfalz - for a number of months, the drive down through this beautiful wine region and wandering around the quaint town of Wachenheim is always worth it. The best part: for this celebration, Schloss Wachenheim was running Sekt through the fountain in its courtyard and for just 125 cents, you could fill your glass from it as often as you liked. We quickly decided that this should be a regular thing, not just at wineries, but really in any fountain. I mean, wouldn't that just make the world a better place?
Another great thing to happen this weekend - we finally got our dSLR! Due some great prices and attractive new financing offers (meaning we can afford a camera and our move to Berlin), we splurged for the Nikon d5100, rather than the entry-level d300 we were considering. This also means there is a steep learning curve for me, so bear with me while I learn. Even without a clue as to what we were doing with the thing, the photos from Sunday turned out markedly better than Saturday's, which were taken just with our little point-and-shoot. And check out that self-photo action, thanks to the d5100's flip screen! I'm really excited to learn more, play more and bring better photos to my blog. Any beginners tips are most welcome!
May 03, 2013
When I used to think of the word 'sweatshirt', I couldn't help but think it was a dirty word. Literally. It brought to mind shapeless, yellowed-cuffs college attire that was emblazoned with some fraternity/college you didn't attend/freebie business logo and hadn't seen the wash since you had last visited your mother. Ahh, how times have changed.
Now, sweatshirts can not only be cool and hip, they can even be pretty. The once bottom rung attire choice has gotten a style upgrade with the likes of trendy dip-dying and feminine add-ons like eyelet, sequins and sparkles (in a completely non-Vegas trailer park way, of course). And with spring in full swing, it's the perfect way to stay warm under your raincoat without rummaging through all your freshly cleaned and put-away-for-the-season winter sweaters.
April 29, 2013
For many years, I believed that green was not the color for me. I avoided all lime, grass and emerald hues, thinking that they somehow didn't work for my pale, Irish coloring (clearly, I needed to branch out). But then one day a little over a decade ago, I tried on a bold green sweater on a whim... and what do you know? I fell in love. These days, I have quite a collection of emerald pieces in my wardrobe.
As spring has sprung this year, after a particularly long and grey winter, I am reminded of how Pantone's color of the year is also the color of the season. Sure, there are blooms of varied colors and glorious blue skies, but emerald is the color that arrives first, leaves last and shines with the most brilliance and abundance in the season's sunshine. It is the color that breathes life into the world around us, waking it - and us - up after months dominated by grey and white. I for one feel recharged by this shade and am inspired to pull more emerald out of my closet and go wiggle my toes in the green, green grass.
*This post is a submission for Pantone's Do You Feel Emerald? blog contest
April 26, 2013
Of course this beautiful weather we've been having was too good to last... Looks like we are back to rain and grey skies for the coming week, so I'm channeling my hopefulness into a return of yesterday's picture-perfect, summer-like day very soon.
Wishing you a happy Friday and a wonderful weekend, wherever you are! Any exciting plans..? We are going wine tasting at a few of our favorite wineries' open cellar days. If there is not going to be any sun, going underground to sip wine amongst the barrels has got to be the next best thing!
Here are a few things on my radar this Friday:
This funny little tumblr illustrating people's Facebook statuses (via Man Repeller).
Kind of wishing a new dress was in the budget for this summer's wedding - not to mention some new shoes.
Daydreaming about what I could do with a new German kitchen I got to design from scratch... like this green kitchen.
With rainy season getting underway, I'm really feeling this right now.
Being late to the everyone-and-their-mother-has-a-dSLR show - not to mention in a major budget crunch - I figured this might be a good place to start. Thoughts..?
Anxiously awaiting a shipment that contains these Tattlys. At least, until he agrees to do the real deal for me.
White Faux Taxidermy is awesome. If European shipping didn't cost an arm and a leg, I'd make that moose head mine.
Happy Friday all!
April 24, 2013
I was on the lookout for a Belgian waffle maker for a good year into our life in Germany, as they are mostly those flat, shallow waffle makers and the ones for deep, thick waffles are rather hard to find. Once I did acquire the right kind of appliance, I was naturally on the hunt for the best waffle recipe I could find. Not surprisingly, I have found Martha Stewart's to be, far and away, the very best. Waffles make me nostalgic for childhood and have become a staple of our weekend breakfasts. The bit of cinnamon and brown sugar in these makes them a stand-out amongst basic waffle recipes.
Martha's Buttermilk Waffles
8 tbsp (1 stick) melted unsalted butter
2 cups all-purpose flour (I use German 405 flour)
1/4-cup packed light brown sugar
1 tsp baking soda
1-1/2 tsp baking powder
1/2 tsp ground cinnamon
1/2 tsp salt
3 large eggs, separated, room temperature
2 cups buttermilk, room temperature
1 tsp pure vanilla extract (hard to come by in Germany, but a must)
Pre-heat waffle iron. In a large bowl, sift together flour, sugar, baking soda, baking powder, cinnamon and salt. In a separate bowl, whisk together egg yolks, buttermilk, melted butter and vanilla. Pour into dry mixture and stir until just combined. In a medium bowl, beat egg whites until firm but not dry. Fold whites into batter. Ladle about 1/3 cup into waffle iron, depending on size, and spread batter almost to edges. Close lid and cook for 3-5 minutes, depending on iron. Transfer waffles to a plate and pop into toaster for a few second to rewarm just before serving.
Martha's recipe says it serves four to six, but unless you're eating an entire platter of waffles, I find this makes much more. As in, 15 single square waffles. She also recommends buttering the iron, but I find that my waffle iron traps too much moisture and this makes my waffles too soggy.
Because this recipe does make so much, and the egg whites deflate unless you use the batter immediately, I cook the entire batch and then freeze them for homemade frozen waffle breakfasts through the following week. A quick pop in the toaster and they are nearly as good as they were on the first day!
adapted from Martha Stewart's Buttermilk Waffle recipe
April 22, 2013
After hemming and hawing over my hair for quite some time now, I finally took the plunge on Sunday and did a whole at-home cut and color. First and foremost, not only am I not a professional (yikes!), but I had no idea what I was doing. So here's how I tackled this challenge and how it turned out...
Since I had cut my bangs at home many times, I was actually less nervous about the cut until the morning of when I realized I had absolutely no idea how to go about an entire haircut. True to form, the great wealth of knowledge that is the internet offered some suggestions. I found this nice little tutorial that seemed simple enough... that is, until I started cutting. Seeing as I also decided to cut my hair dry for fear of cutting off more than I intended, it meant chopping through a ponytail full of half my hair - and I have a lot of hair. I quickly started to see how this would be much easier when wet, but I had started down this road and was now committed (in case you were wondering, I was using proper hair-cuttings scissors, so the issue was clearly my hair).
I managed to get through the ponytails as even as I could, but had to enlist my husband's help evening out the back (to avoid that v-shape). I was so nervous, I cut little by little until I was just too scared to cut anymore and made the whole process an hour longer than it needed to be. It's probably a touch longer than what I was shooting for, but better that than too short. My first finger still bears the blister and bruising from all this effort with the scissors, but hey, I didn't have to shell out €100 for a haircut, so I'm sucking it up. I evened it out a bit more when it was wet from my post-color shampoo and I think that helped. Luckily, I also had a hair-cutting-experienced friend who offered to help out if the cut went to awry.
I decided to go ombre with the color because of it's low commitment (no roots to touch up!) and because I'm still not sold on getting rid of my natural color all together, even as just a base for highlights. So, I watched several tutorials on the L'Oréal Wild Ombrés colors (I believe these are under the Féria line in the States, but over here, it's part of the Préférence line) and it looked even easier than regular hair color. I also liked that the 'after' photos on the all the reviews I saw weren't crazy drastic, but more of a subtle lighter color. I also chose the less drastic Ombré N°2 (070 in the Féria line), for dark blond to medium brown hair, rather than the lightest blond, so that my results would err more on the natural side. I figured I could always go back over it with a lighter color if I wanted it more dramatic.
The one thing I did notice on all but one review of the product was that everyone seemed to follow the instructions literally, which resulted in more of a dip-dye look as opposed to a fading ombre. Since I wanted more of a fade, applied the color higher and higher up my hair in ten minute increments, so that the color on the bottom was on for the longest and therefore would be more processed (read: lighter) than the next section higher. I had my husband help a bit with the back (so as not to end up with a color-v as well), but mostly just brushed it in haphazardly so that it would result in what I hoped would be a naturally-highlighted fade. I brushed some higher in the pieces that frame my face for even more color variation. In all, I would say I had the color on some part of my hair for nearly the maximum amount of time (45 minutes) before I washed it out.
In the shower, I could already see how blonde the ends looked and this was only magnified as my hair began to dry. But after my hair was totally dry and styled, the blond no longer seemed as light. Perhaps it was because of the curl in my hair or the rapidly fading daylight, but it was harder to see the significantly lighter ends.
Some close-up shots, as well as seeing the color in various lighting, helped demonstrate the color results a bit better. It is definitely on the warmer, brassier side of blond, but because my hair still has a fair amount of red tones from my time as a redhead, it works nicely with the color I already have on my hair.
Overall, I'm very happy with the results of my little hair experiment. I got fun new hair for the cost of a box of color (€6,95) and a bit of a bruised finger. While I may decide to brush some even lighter color through the bottom section and may have to enlist the help of my hair-cutting friend once I see the cut on a more straight hair day, for now, I am a convert to this whole DIY hair concept. I'm sure my wallet is too!
Subscribe to:
Posts (Atom)